
Intro
We often had to use the Raspberry Pi for various modules in recent years. Since then I haven’t actually used it. I saw it laying on my desk, so I wondered what I could do with it With its small size and versatility, I thought it would be a fun experiment to see how it would function as a router / wireless access point in my bedroom.
I would like to thank the lecturers @ Howest who gave the network, Linux and hardware -modules. Since I learned the necessary knowledge from them to carry this out. Finally, I would like to thank content creator ‘Network Chuck’, who gave me the idea and guidance to conduct this experiment.
This use case-driven paper was created for the professional networking module. Its purpose is to inform the reader on how to make a wireless access point from a Raspberry Pi. It holds the different steps, the requirements, my final result, and the conclusion. Based on this paper, the reader should be able to replicate this themselves afterward.
Materials and Preparation
Here you have a summarized list of all requirements:
- To set this up you’ll first need a Raspberry Pi of course. Personally, I used model 4B with 2 Gigabytes of RAM.
- You’ll also need a MicroSD card, 8GB should be sufficient but I used a 16GB card. Make sure you can plug this SD card into your computer otherwise I recommend purchasing an adapter for this.
- Because you want the device to function as a wireless access point you’ll also need another interface. For this, you can use a simple USB WiFi adapter, like the one you can see in the picture. These are relatively inexpensive and can be bought for around 10 euros. I still had one laying around from a previous project.
- You should be able to connect to the Pi. For this, you can use an ethernet cable. I’ll come back to this in the next chapter.
- Of course, it’s also necessary to power the device, so you’ll need the associated power supply
- The last thing needed is the OpenWRT image file. This can be downloaded from their official website (openwrt.org/downloads). Make sure you download the correct image associated with the model of your Raspberry Pi
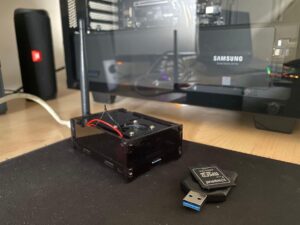
It is not necessary but I think it’s a fun addition to use a case for your Raspberry Pi. Personally, I ordered a stylish case on the web store of Sossolutions, adding the perfect touch of tech-savvy to my project. However, assembling the case was a bit of a challenge, requiring careful attention and patience. Despite the tedious process, I really liked the end result and now have a beautifully finished Raspberry Pi that not only looks amazing but is also protected from potential damage.
Setting everything up
Installing OpenWRT
The process was straightforward and easy to follow. To begin, I downloaded the associated OpenWRT image file from the official website (openwrt.org/downloads) for my Raspberry Pi.
I used an adapter to insert the MicroSD card into my computer and wrote the disk image to the card, for this I used the official ‘Raspberry Pi Imager’ tool. Again this process was pretty straightforward after selecting the image and SD card, it was just a matter of clicking a button.
Once the imager tool was finished, I extracted the SD card, inserted it into my Raspberry Pi, and powered it on by connecting the power supply.
Connecting to the Pi
To configure the Raspberry Pi, I connected it to my PC using an Ethernet cable. All I had to do was set a static IP in the same range and use the correct default gateway (192.168.1.1). This allowed me to access the OpenWRT web interface and I was also able to make an SSH connection to the Pi.
Secure and turn on WiFi
Following the OpenWRT Quick Start Guide, I was able to set up the access point on the OpenWRT firmware.
When I logged into the Pi, I saw that the root user didn’t have a password set, so for security reasons I changed it using the passwd command just like in other Linux distributions.
The main directory of config files I was working in was located at ‘/etc/config’. Before changing these files I made sure I had a backup. So I copied the DHCP, firewall, network, and wireless config files and added the extension ‘.bk’ to the filenames.
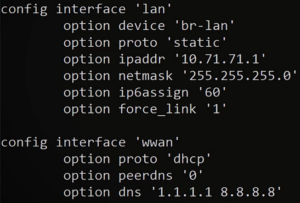
I started by editing the network config to change the static IP address of the LAN interface which I’m connected to with my laptop. This is by all means not necessary if you’re just doing this as an experiment but I did it anyway for security reasons. Also in this config, I added an additional interface called ‘wwan’ so my pi can connect wirelessly over the network using its on-board WiFi.
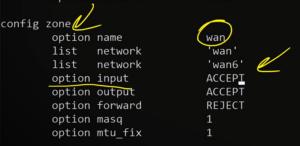
Next, I updated the firewall config so the incoming traffic for the ‘wan’ zone gets accepted. By default it was on ‘REJECT’, I just had to change it to ‘ACCEPT’. Then, I performed a reboot to apply the configured settings. Obviously, I also had to change the static IP of the LAN interface of my computer since I changed it before.
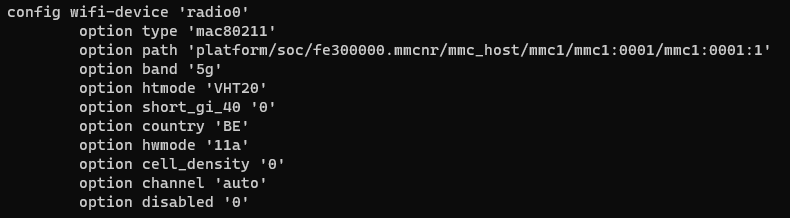
Afterward, I edited the ‘/etc/config/wireless’ file to enable what OpenWRT calls the ‘wifi-device’. I did this by changing the disabled option to ‘0’. Also, I changed some of the other options such as channel, hwmode and htmode. I didn’t change these options directly in the config file. Instead, I used the uci set wireless.radio0.country=’BE’ command so the options conform with your country.
After applying these changes I made use of the uci commit wireless and wifi commands to update the configurations.
I still had to connect to my wireless home network, for this I used the graphical interface which can be used when typing the IP of the LAN interface into a web browser. I logged in with the root user, went over to the wireless tab, and was able to connect the ‘wifi-device’ to my network using the scan button, simply select my network and supply the password. After doing all that I tried to ping ‘google.be’ and everything seemed to work.
Configuring the USB WiFi Adapter
In order for the USB WiFi adapter to work I had to install some packages. OpenWRT uses the opkg package manager, so I started with updating the package repositories by running opkg update. Afterward, I installed the following packages: “kmod-rt2800-lib kmod-rt2800-usb kmod-rt2x00-lib kmod-rt2x00-usb kmod-usb-core kmod-usb-uhci kmod-usb-ohci kmod-usb2 usbutils”. With these installed almost any WiFi USB adapter should work.
After installing the packages, my adapter showed up when running the lsusb command. This meant my driver was accepted and working correctly. So I created another wlan interface for the adapter using the ifconfig command.
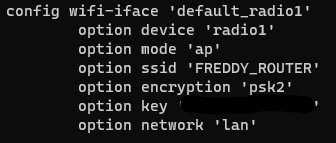
The new interface also appeared in the ‘/etc/config/wireless’ config file, just like before I also had to change the disabled option to ‘0’. Then, I set an SSID, changed the encryption to psk2, and added a key that will be later used to connect to the network.
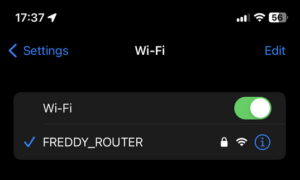
After applying all changes using the associated commands, I could already see the network showing up on my phone and I was able to connect using the key I chose. Also in the OpenWRT GUI, I could see my device was connected to the router. When trying to browse the internet everything seemed to work as expected.
Performing a speed test
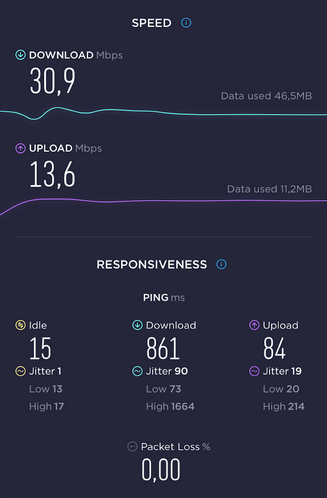
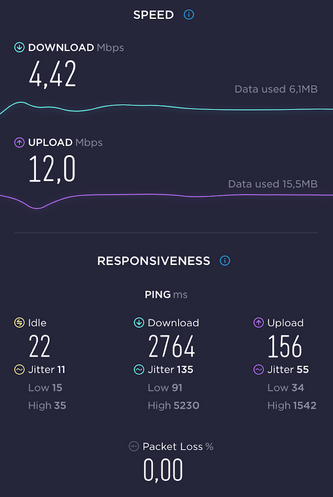
As you can see in the picture on the left, the wireless connection in my bedroom is far from optimal so I was curious to see if the Raspberry Pi could improve the situation. Unfortunately, the results weren’t what I expected. As shown in the picture at the right, the OpenWRT router had a significantly slower download speed, about 85% slower. Also, the overall ping was generally a lot higher.
Conclusion
While the process was a fun experiment, I found that the Raspberry Pi’s performance as a router wasn’t quite up to par with my needs. After conducting a speed test, I discovered that the Pi was about 80% slower than just using the WiFi on my phone.
Despite the result, it was a valuable experiment that taught me about the capabilities of the Raspberry Pi and its limitations.
The results of this experiment don’t mean that using a Raspberry Pi as a router is completely useless. If you already have faster wireless internet than I do, the results might be a lot more reasonable, if the Pi can handle it of course. Or it may also be a useful solution as a portable wireless access point for traveling or in other limited network setups.